2008-12-30

Sizing Apache in front of WebLogic

Apache is a very used HTTP WebServer.

And I can't count the number of times I have been working with clients using it in their architectures.

But often, it is used with the default configuration or slightly tuned.

Even if this is normally not part of my job, I guess it's important to know how to use it properly.

You may also take a look at the post I wrote about SSL between Apache & WLS.


First of all : monitoring your workers


Well, first of all, I think it's essential to know how your Apache WS reacts.

Indeed, when load-testing your application, it's good to know how your application server behaves,

(hoping it's WebLogic ;) ) but it's also good to know if the webserver (or a load balancer hardware) is not a potential bottleneck.


Configuration


To do so, it's quite easy : just activate the webserver status like shown below :


LoadModule status_module modules/mod_status.so

ExtendedStatus On

[...]

<Location /server-status>
    SetHandler server-status
    Order Deny,Allow
    Deny from all
    Allow from .foo.com
</Location>

<LocationMatch "/(?!server-status)">
    SetHandler weblogic-handler
    # Conf WLS ...

</LocationMatch>


Let me explain that configuration.

  1. => LoadModule [...]/mod_status.so  : mandatory if we want to monitor Apache (more info)
  2. => ExtendedStatus : allows to see some additional configuration, like CPU, memory ... Essential then. Beware of the performance !
  3. => Location /server-status : all incoming requests on this URI will be handled by the server-status
  4. => LocationMatch "/(?!server-status)" : requests on all the other URIs will be handled by WebLogic


Note : LocationMatch allows you to use regular expressions. I personnaly refer to python doc when needed.


Result : what does it display ?


image


What's important here is: 1 requests currently being processed, 249 idle workers

And if you look at your default configuration, you'll see that the number of requests "currently being processed" added

to the number of idle workers is the number set in the httpd.conf : ThreadsPerChild 250

Considering the scoreboard :


Scoreboard Key: 
  • "_" Waiting for Connection
  • "S" Starting up
  • "R" Reading Request
  • "W" Sending Reply
  • "K" Keepalive (read)
  • "D" DNS Lookup
  • "C" Closing connection
  • "L" Logging
  • "G" Gracefully finishing
  • "I" Idle cleanup of worker
  • "." Open slot with no current process
 

We then have one working thread 'W', 249 idle '_' and a big number that do nothing.


Sizing your Apache


Let's take a number of ThreadsPerChild equal to 1920.

If we set that value, what's displayed is different :


image


I've reached the maximum number of workers for my configuration.

That way, Apache will reserve all the possible workers to serve requests.

This configuration implies a higher CPU activity. That's why you've got to adjust the number of workers, following your

capacity planning, in order to have a good compromise.


Note : It's not the only parameter you can play with to tune your webserver, but this one is quite important.


2008-11-25

Using WLDF to trace the time taken by your methods

WLDF stands for WebLogic Diagnostic Framework.

It's shipped within WebLogic Server and allow three types of features to help you diagnose your application and/or server :

  • => Collected Metrics
  • => Watch & Notification
  • => Instrumentation

We're going to focus on the AOP feature, commonly known as "Instrumentation".

I assume you're familiar with AOP concepts.


Sample Application : presentation


Our application is composed of three classes, calling each other the following way :

Component1 -> Component2 -> Component3

Each call will be delayed by a pause, in order to be able to observe some concrete data later.


image


For instance, here's the code for Component1 :


package fr.mbutton.blog.wldf;

/**
* @author mbutton
*
*/
public class Component1 implements CallerInterface {
    public void call () {
        try {
            Thread.sleep(5000);
        } catch (InterruptedException e) {
            // TODO Auto-generated catch block
            e.printStackTrace();
        }
        CallerInterface comp = new Component2();
        comp.call();
    }

}


Configuring WLDF


From the application point of view


The configuration is pretty easy. It is embodied in a file weblogic-diagnostics.xml, which resides in the META-INF directory.

(I have chosen application scope, but you may chose the server scope. This is discussed in the official documentation)


image


Here's the content of this file :


<wldf-resource xmlns="http://www.bea.com/ns/weblogic/90/diagnostics"
    xmlns:xsi="http://www.w3.org/2001/XMLSchema-instance"
    xsi:schemaLocation="http://www.bea.com/ns/weblogic/90/diagnostics.xsd">
    <name>Sample WLDF resource</name>
    <instrumentation>
        <enabled>true</enabled>
        <wldf-instrumentation-monitor>
            <name>sample</name>
            <enabled>true</enabled>
            <action>TraceElapsedTimeAction</action>
            <location-type>around</location-type>
            <pointcut>execution( * fr.mbutton.blog.wldf.* call*(...));</pointcut>
        </wldf-instrumentation-monitor>
    </instrumentation>
</wldf-resource>


Let's take a closer look to the tags :

  • => enabled : has obviously to be set to true :) for both instrumentation & monitor
  • => name : has to be unique
  • => action : the action that has to be performed. Can be one of the following :

      DisplayArgumentsAction
      StackDumpAction
      ThreadDumpAction
      TraceAction
      TraceElapsedTimeAction

  • => location-type : before / after / around
  • => pointcut : the kind of execution on which the AOP behavior has to be performed

For more information, as usual, take a look at the official documentation.


From the server point of view


You have to configure a DyeInjectionMonitor.

To do so, activate the instrumentation by creating a module, and activating the instrumentation like shown below :


image


You may configure the DyeInjectionMonitor by adding some "Dye Flag".


image 


For instance, here I added the dye flag "ADDR1". Make sure the flag you've chosen appears in the authorized constants.


Deploy your application to the server.


You may encounter the following error while deploying from Workshop.


image


It comes from the fact the console in development mode does not use (in theory) the configuration management,

aka the "Lock & Edit" feature.

To fix that, use WLST to release the lock, like :


image


I know it's not cool, but sometimes that's just the way it is.

And if you're not familiar with WLST, it will be the perfect occasion :)

Once deployed, launch the class Component1.


Displaying the data with the WLDF console extension


Installing the console extension


The console extension has to be installed into your domain. A console extension is a single JAR file.

For the WLDF extension, it's shipped within the standard WLS distribution.

You will find it here : BEA_HOME \ wlserver_10.3 \ server \ lib \ console-ext \ diagnostics-console-extension.jar

Then copy it in the directory : DOMAIN_HOME \ console-ext

Restart your server and you should see a new tab :


image


Viewing the collected data


Click this new tab, and then go in the "Request" tab.

Choose the server on which you have the EAR deployed (if many)

If no data is visible, click reload and then refresh.

You should get something like :


result2


If you chose a particular method call, you may see a more detailed view like :


result


Let's zoom the contextual window :


image


There you go : you have a powerful tool, right here with no extra product ! :)

Hope it gave you a good example of the AOP use of WLDF.

If you want more info about WLDF, take a look at the page :

http://download-llnw.oracle.com/docs/cd/E13222_01/wls/docs90/wldf_configuring/index.html


Have fun !


2008-11-11

How to configure WebLogic to use SSL with Apache ?

We will start this example from the very beginning.

We'll create a certificate, a keystore and will perform all the different steps needed to get us started (using Keytool & OpenSSL)

Then we'll configure WebLogic to use that keystore.

Once a browser is able to access WebLogic, we will configure Apache to use SSL with WebLogic.


1 - Create a CSR & a keystore

In order to create these components, the tool used is Keytool from Sun. You have it in any JVM install :

For me it's : %BEA_HOME%\jdk160_05\bin\keytool.exe

For this example, as I'm lazy sometimes, I'm going to use Keytool UI, which is a graphical version of keytool, as its name tells.

First, let's create a sample and empty JKS. (JKS stands for Java KeyStore)


image 


In this example, the password used is "weblogic".


Then just create a CSR (Certificate Signing Request)

Specify the previously created JKS and the algorithm to use :


image


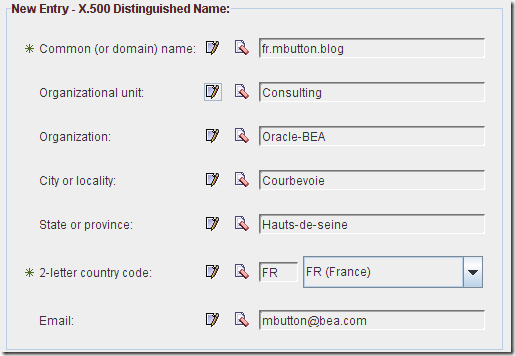
Fill in the different fields, as you would with Keytool :


image


The creation should result in a small popup :


image


Viewing the content of the keystore


image


I used the following for the private key :

  • alias : privatekey
  • password : weblogic


2 - Configure WebLogic to use the previously created keystore

That's the easy part :)

Start your server and check that you have SSL enabled.


image


Then just change the identity of the server to point towards our keystore.


image


Here are the different options proposed. In our example, the option that best fits our need is "Custom identity & Java Standard Trust".

"Custom Identity" means we're using our own keystore and "Java Standard Trust" means we use the truststore from the JDK.

(%BEA_HOME%\jdk160_05\jre\lib\security\cacerts)

A truststore is a keystore containing all the trusted certificates.

You may print the truststore, just to see what's inside :


image


You can see that Verisign, Thawte and many other CA (Certificate Authorities) are listed.


image


image


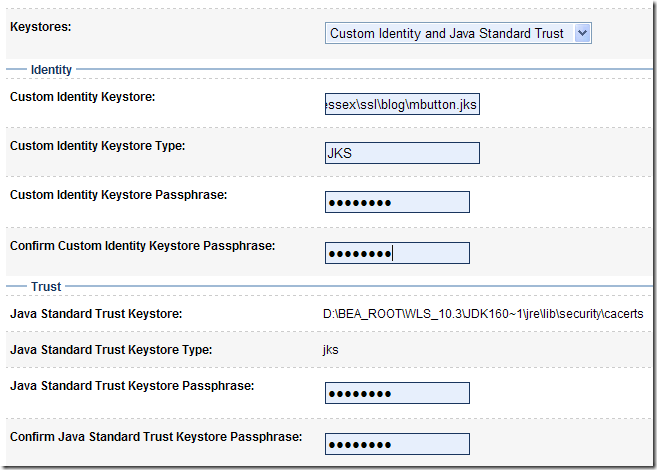
We only have to specify the keystore we created, the type which is JKS and the password.

As for the Trust, just type the default password, which is "changeit".


A quick look in the WLS console shows :


<10 nov. 2008 23 h 47 CET> <Error> <WebLogicServer> <BEA-000297>
<Inconsistent security configuration, weblogic.management.configuration.ConfigurationException:
Cannot retrieve identity certificate and private key on server AdminServer, because the keystore entry alias is not specified.>

<10 nov. 2008 23 h 47 CET> <Error> <Server> <BEA-002618>
<An invalid attempt was made to configure a channel for unconfigured protocol "Cannot retrieve identity certificate
and private key on server AdminServer, because the keystore entry alias is not specified.".>


It's because we didn't supply the private key alias.


image


Just type the alias (privatekey) and the password (weblogic) and save.

This time, WLS seems to be happier :


<10 nov. 2008 23 h 52 CET> <Notice> <Security> <BEA-090171>
<Loading the identity certificate and private key stored under the alias privateKey from the JKS keystore
file D:\BEA_ROOT\user_projects\domains\essex\ssl\blog\mbutton.jks.>

<10 nov. 2008 23 h 52 CET> <Notice> <Security> <BEA-090169>
<Loading trusted certificates from the jks keystore file D:\BEA_ROOT\WLS_10.3\JDK160~1\jre\lib\security\cacerts.>

<10 nov. 2008 23 h 52 CET> <Notice> <Server> <BEA-002613>
<Channel "DefaultSecure" is now listening on 192.168.1.4:7002 for protocols iiops, t3s,
CLUSTER-BROADCAST-SECURE, ldaps, https.>

<10 nov. 2008 23 h 52 CET> <Notice> <Server> <BEA-002613>
<Channel "DefaultSecure[1]" is now listening on 127.0.0.1:7002 for protocols iiops, t3s,
CLUSTER-BROADCAST-SECURE, ldaps, https.>


Let's try to access the console using the secure port (7002).

A popup shows up :


image


Just some warning message saying that the certificate has been emitted by someone I don't trust

and that the certificate name doesn't match the site name.


image


It works.


3 - Display the certificate presented by WebLogic


To display the certificate, we've got two possibilities :

Click the lock in the browser window and use the built-in functionality to display the certificates.


image


Or use OpenSSL, which is the method I prefer.


C:\Documents and Settings\mbutton>openssl s_client  -connect localhost:7002
Loading 'screen' into random state - done
CONNECTED(00000728)
depth=0 /emailAddress=mbutton@bea.com/C=FR/ST=Hauts-de-seine/L=Courbevoie/O=Oracle-BEA/OU=Consulting/CN=fr.mbutton.blog
verify error:num=18:self signed certificate
verify return:1
depth=0 /emailAddress=mbutton@bea.com/C=FR/ST=Hauts-de-seine/L=Courbevoie/O=Oracle-BEA/OU=Consulting/CN=fr.mbutton.blog
verify return:1
---
Certificate chain
0 s:/emailAddress=mbutton@bea.com/C=FR/ST=Hauts-de-seine/L=Courbevoie/O=Oracle-BEA/OU=Consulting/CN=fr.mbutton.blog
   i:/emailAddress=mbutton@bea.com/C=FR/ST=Hauts-de-seine/L=Courbevoie/O=Oracle-BEA/OU=Consulting/CN=fr.mbutton.blog
---
Server certificate
-----BEGIN CERTIFICATE-----
MIICtzCCAiCgAwIBAgIESRixbTANBgkqhkiG9w0BAQUFADCBnzEeMBwGCSqGSIb3
DQEJARYPbWJ1dHRvbkBiZWEuY29tMQswCQYDVQQGEwJGUjEXMBUGA1UECAwOSGF1
dHMtZGUtc2VpbmUxEzARBgNVBAcMCkNvdXJiZXZvaWUxEzARBgNVBAoMCk9yYWNs
ZS1CRUExEzARBgNVBAsMCkNvbnN1bHRpbmcxGDAWBgNVBAMMD2ZyLm1idXR0b24u
YmxvZzAeFw0wODExMTAyMjEwNTNaFw0xMTExMTAyMjEwNTNaMIGfMR4wHAYJKoZI
hvcNAQkBFg9tYnV0dG9uQGJlYS5jb20xCzAJBgNVBAYTAkZSMRcwFQYDVQQIDA5I
YXV0cy1kZS1zZWluZTETMBEGA1UEBwwKQ291cmJldm9pZTETMBEGA1UECgwKT3Jh
Y2xlLUJFQTETMBEGA1UECwwKQ29uc3VsdGluZzEYMBYGA1UEAwwPZnIubWJ1dHRv
bi5ibG9nMIGfMA0GCSqGSIb3DQEBAQUAA4GNADCBiQKBgQCE4Eu/kWbTfjFQNWzm
YEGLEO8Mp7SY9R2d4MpZTCAPdS7DSjY1AsJMlTDxomsWAKdU/UaQuf0quyuO4oiM
7IxFMTHXEZ1TgXMUgHGgNYnkQIivcbskUFJuPUoYHW6mR9rlIkkVSkTPUVWaGvzt
gubEQhUvc1ndt8bpQRmnnOkZgQIDAQABMA0GCSqGSIb3DQEBBQUAA4GBAEEpAwNF
Fa21wGzoBk7WzQkHuWKfY3D2mCuON+u9GWHxrQoDG+u6i4LyY/5DK9IMrs5tzq7u
9htJAryKJVMpHH05Nb0Bq9ZENylHLb8nIeAZP6A8w1WVb4xfRC1KAz7HLcA3xlBw
9+RanPitwglr9GX6teINf8te3m7hVS1wC3Hg
-----END CERTIFICATE-----

subject=/emailAddress=mbutton@bea.com/C=FR/ST=Hauts-de-seine/L=Courbevoie/O=Oracle-BEA/OU=Consulting/CN=fr.mbutton.blog
issuer=/emailAddress=mbutton@bea.com/C=FR/ST=Hauts-de-seine/L=Courbevoie/O=Oracle-BEA/OU=Consulting/CN=fr.mbutton.blog
---
No client certificate CA names sent
---
SSL handshake has read 829 bytes and written 306 bytes
---
New, TLSv1/SSLv3, Cipher is RC4-MD5
Server public key is 1024 bit
Compression: NONE
Expansion: NONE
SSL-Session:
    Protocol  : TLSv1
    Cipher    : RC4-MD5
    Session-ID: 48076FBB49156AD46E8B1DE5C6761319
    Session-ID-ctx:
    Master-Key: 0FE8F6A1A4A498FBE9832D7BE2FD999C2DA9C697F1311F6DE39A461293AD643E12DB8089828082581352D8FD5FF8E310
    Key-Arg   : None
    Start Time: 1226358012
    Timeout   : 300 (sec)
    Verify return code: 18 (self signed certificate)
---


The section in red represents the certificate presented by the server.

ASCII delimited by "-----BEGIN CERTIFICATE-----" & "-----END CERTIFICATE-----" means it's a PEM.

We need to isolate it. Then just copy it in a file and name it "server.pem" for instance.


4 - Configure Apache SSL to access WebLogic


First, copy the apache plugin in the apache modules directory.

%BEA_ROOT%\wlserver_10.3\server\plugin\win\32\mod_wl_22.so

towards %APACHE_HOME%\modules

In your httpd.conf, add the following lines to have a clean and separate configuration for WebLogic.


############## WLS 10 Proxy Plugin
<IfModule !mod_weblogic.c>
    LoadModule weblogic_module modules/mod_wl_22.so
</IfModule>

<IfModule mod_weblogic.c>
  # Config file for WebLogic Server that defines the parameters
  Include conf/weblogic.conf
</IfModule>


These few lines include the file weblogic.conf.

This file looks like :


<IfModule mod_weblogic.c>

    <Location  /console>
            SetHandler weblogic-handler
            WebLogicHost localhost
            WebLogicPort 7002

    # SSL
    SecureProxy ON
    WLProxySSL ON
    RequireSSLHostMatch false
    TrustedCAFile D:\BEA_ROOT\user_projects\domains\essex\ssl\blog\server.pem
    EnforceBasicConstraints false

    # DEBUG
    WLLogFile D:\BEA_ROOT\user_projects\domains\essex\ssl\blog\wlproxy.log
    Debug ALL
    DebugConfigInfo ON
    </Location>
</IfModule>


As you may have noticed, the "TrustedCAFile" is the full path towards our server certificate (the one we got from OpenSSL !)

For more information about configuring WebLogic plugin, http://edocs.bea.com/wls/docs100/plugins/apache.html


Then accessing the console through the following URL : http://localhost/console shows in the wlproxy.log :


Tue Nov 11 00:08:43 2008 <502412263585231>
================New Request: [GET /console HTTP/1.1] =================
Tue Nov 11 00:08:43 2008 <502412263585231> INFO: SSL is configured
Tue Nov 11 00:08:43 2008 <502412263585231> SSL Main Context not set. Calling InitSSL
Tue Nov 11 00:08:43 2008 <502412263585231> INFO: SSL configured successfully
Tue Nov 11 00:08:43 2008 <502412263585231> Using Uri /console
Tue Nov 11 00:08:43 2008 <502412263585231> After trimming path: '/console'
Tue Nov 11 00:08:43 2008 <502412263585231> The final request string is '/console'
Tue Nov 11 00:08:43 2008 <502412263585231> Host extracted from serverlist is [localhost]
Tue Nov 11 00:08:43 2008 <502412263585231> Initializing lastIndex=0 for a list of length=1
Tue Nov 11 00:08:43 2008 <502412263585231> getListNode: created a new server node: id='localhost:7002' server_name='localhost', port='80'
Tue Nov 11 00:08:43 2008 <502412263585231> attempt #0 out of a max of 5
Tue Nov 11 00:08:43 2008 <502412263585231> Trying a pooled connection for '127.0.0.1/7002/7002'
Tue Nov 11 00:08:43 2008 <502412263585231> getPooledConn: No more connections in the pool for Host[127.0.0.1] Port[7002] SecurePort[7002]
Tue Nov 11 00:08:43 2008 <502412263585231> general list: trying connect to '127.0.0.1'/7002/7002 at line 2619 for '/console'
Tue Nov 11 00:08:43 2008 <502412263585231> New SSL URL: match = 0 oid = 22
Tue Nov 11 00:08:43 2008 <502412263585231> Connect returns -1, and error no set to 10035, msg 'Unknown error'
Tue Nov 11 00:08:43 2008 <502412263585231> EINPROGRESS in connect() - selecting
Tue Nov 11 00:08:43 2008 <502412263585231> Setting peerID for new SSL connection
Tue Nov 11 00:08:43 2008 <502412263585231> 7f00 0001 5a1b 0000                          ....Z...
Tue Nov 11 00:08:43 2008 <502412263585231> Local Port of the socket is 1782
Tue Nov 11 00:08:43 2008 <502412263585231> Remote Host 127.0.0.1 Remote Port 7002
Tue Nov 11 00:08:43 2008 <502412263585231> general list: created a new connection to '127.0.0.1'/7002 for '/console', Local port:1782
Tue Nov 11 00:08:43 2008 <502412263585231> Hdrs from clnt:[Accept]=[image/gif, image/x-xbitmap, image/jpeg, image/pjpeg, ...

Tue Nov 11 00:08:43 2008 <502412263585231> Hdrs from clnt:[Accept-Language]=[fr]
Tue Nov 11 00:08:43 2008 <502412263585231> Hdrs from clnt:[Accept-Encoding]=[gzip, deflate]
Tue Nov 11 00:08:43 2008 <502412263585231> Hdrs from clnt:[User-Agent]=[Mozilla/4.0 (compatible; MSIE 6.0; Windows NT 5.1; ...

Tue Nov 11 00:08:43 2008 <502412263585231> Hdrs from clnt:[Host]=[localhost]
Tue Nov 11 00:08:43 2008 <502412263585231> Hdrs from clnt:[Connection]=[Keep-Alive]
Tue Nov 11 00:08:43 2008 <502412263585231> URL::sendHeaders(): meth='GET' file='/console' protocol='HTTP/1.1'
Tue Nov 11 00:08:43 2008 <502412263585231> Hdrs to WLS:[Accept]=[image/gif, image/x-xbitmap, image/jpeg, image/pjpeg, ...

Tue Nov 11 00:08:43 2008 <502412263585231> Hdrs to WLS:[Accept-Language]=[fr]
Tue Nov 11 00:08:43 2008 <502412263585231> Hdrs to WLS:[Accept-Encoding]=[gzip, deflate]
Tue Nov 11 00:08:43 2008 <502412263585231> Hdrs to WLS:[User-Agent]=[Mozilla/4.0 (compatible; MSIE 6.0; Windows NT 5.1; ...

Tue Nov 11 00:08:43 2008 <502412263585231> Hdrs to WLS:[Host]=[localhost]
Tue Nov 11 00:08:43 2008 <502412263585231> Hdrs to WLS:[Connection]=[Keep-Alive]
Tue Nov 11 00:08:43 2008 <502412263585231> Hdrs to WLS:[WL-Proxy-SSL]=[true]
Tue Nov 11 00:08:43 2008 <502412263585231> Hdrs to WLS:[WL-Proxy-Client-IP]=[127.0.0.1]
Tue Nov 11 00:08:43 2008 <502412263585231> Hdrs to WLS:[Proxy-Client-IP]=[127.0.0.1]
Tue Nov 11 00:08:43 2008 <502412263585231> Hdrs to WLS:[X-Forwarded-For]=[127.0.0.1]
Tue Nov 11 00:08:43 2008 <502412263585231> Hdrs to WLS:[X-WebLogic-KeepAliveSecs]=[30]
Tue Nov 11 00:08:43 2008 <502412263585231> Hdrs to WLS:[X-WebLogic-Force-JVMID]=[unset]
Tue Nov 11 00:08:43 2008 <502412263585231> INFO: Certificate validation succeeded
Tue Nov 11 00:08:43 2008 <502412263585231> INFO: Negotiated to cipher: 3
Tue Nov 11 00:08:43 2008 <502412263585231> SSLWrite sent 782
Tue Nov 11 00:08:43 2008 <502412263585231> SSLWrite completed, sent 782
Tue Nov 11 00:08:43 2008 <502412263585231> Reader::fill() SSLRead success, read: 202
Tue Nov 11 00:08:43 2008 <502412263585231> URL::parseHeaders: CompleteStatusLine set to [HTTP/1.1 302 Moved Temporarily]
Tue Nov 11 00:08:43 2008 <502412263585231> URL::parseHeaders: StatusLine set to [302 Moved Temporarily]
Tue Nov 11 00:08:43 2008 <502412263585231> Hdrs from WLS:[Date]=[Mon, 10 Nov 2008 23:08:43 GMT]
Tue Nov 11 00:08:43 2008 <502412263585231> Hdrs from WLS:[Transfer-Encoding]=[chunked]
Tue Nov 11 00:08:43 2008 <502412263585231> Hdrs from WLS:[Location]=[https://localhost/console/]
Tue Nov 11 00:08:43 2008 <502412263585231> Hdrs from WLS:[X-WebLogic-JVMID]=[-353258681]
Tue Nov 11 00:08:43 2008 <502412263585231> Hdrs from WLS:[X-Powered-By]=[Servlet/2.5 JSP/2.1]
Tue Nov 11 00:08:43 2008 <502412263585231> parsed all headers OK
Tue Nov 11 00:08:43 2008 <502412263585231> sendResponse() : r->status = '302'
Tue Nov 11 00:08:43 2008 <502412263585231> Hdrs to client (reset):[Date]=[Mon, 10 Nov 2008 23:08:43 GMT]
Tue Nov 11 00:08:43 2008 <502412263585231> Hdrs to client (reset):[Location]=[https://localhost/console/]
Tue Nov 11 00:08:43 2008 <502412263585231> for 127.0.0.1/7002/7002, updated JVMID: -353258681
Tue Nov 11 00:08:43 2008 <502412263585231> Hdrs to client (reset):[X-Powered-By]=[Servlet/2.5 JSP/2.1]
Tue Nov 11 00:08:43 2008 <502412263585231> Reader::fill() SSLRead success, read: 255
Tue Nov 11 00:08:43 2008 <502412263585231> Reader::fill() SSLRead success, read: 8
Tue Nov 11 00:08:43 2008 <502412263585231> canRecycle: conn=1 status=302 isKA=1 clen=-1 isCTE=1
Tue Nov 11 00:08:43 2008 <502412263585231> closeConn: pooling for '127.0.0.1/7002'
Tue Nov 11 00:08:43 2008 <502412263585231> request [/console] processed sucessfully..................


And if we set a bad certificate name, restart Apache, an access to the same URL shows :


Tue Nov 11 00:09:59 2008 <340812263585991>
================New Request: [GET /console HTTP/1.1] =================
Tue Nov 11 00:09:59 2008 <340812263585991> INFO: SSL is configured
Tue Nov 11 00:09:59 2008 <340812263585991> SSL Main Context not set. Calling InitSSL
Tue Nov 11 00:09:59 2008 <340812263585991> ERROR: SSL initialization failed


So this it ...

Hope it was clear and useful. Anyway, here are just the main lines. Don't go in production with such a configuration :)

(even if it's not worst than using WebLogic DemoTrust & DemoCertificates ...)


Mots clés Technorati : ,,,,,

2008-11-04

[Book Review] BPEL for Web Services 2nd Edition


Lately (thanks to the fact we've been absorbed by Oracle), I've been quite interested in BPEL and especially in Oracle BPEL Process Manager.

I ran into some tutorials, easily findable on OTN and that gave me the will to go further.

Unfortunately, since I'm still a BEA consultant, I'm not working with this product

and therefore, I can't play with it in my everyday life (and I don't think my clients would appreciate :D)


I then decided to get a book covering the subject, but which one ?

As usually, I looked at Packt Publishing, who's covering (generally well) that kind of topic.

Bingo ! I found that book "Business Process Execution Language" for Web Services - 2nd Edition" which matches at 100% my need !

Actually, I got this one, which is the french version :)


I particularly appreciated the book "Service Oriented Architecture with Java" but this one is awesome.

It goes with a general presentation on how BPEL links with SOA. Then, the webservice stack is detailed (WSSE, WS-Coordination ...)

And after that appetizer, we dive into BPEL, and its implementation in OPM (Oracle BPEL Process Manager).

That's was really agreable to read, I wouldn't say it's like a roman, but ...

Next chapter, Advanced BPEL : we see some more elaborate process.

Well, I could go on but go take a look at the full TOC and you'll see what I'm talking about.

A special note for the chapter 6, which deals with proprietary behaviors from OPM and WSIF (which personnally reminds me a bit of an EAI ...)


You may get a taste of it by reading this sample chapter.


As you may have understood, this book is excellent for who wants to work with BPEL and OPM.

(the last chapter deals with Microsoft BizTalk, but I didn't read it !)


Strongly recommended !!!


JDeveloper 11 & SOA / BPEL

Today, I downloaded JDeveloper 11 production version, the brand new version of the Oracle IDE.

First look, that's not bad : quite sexy indeed.

Okay, let's leave that look 'n' feel matter and back to business ! Let's design a sample BPEL process ...

After 5 minutes of furious clicks (yes, I'm more used to Eclipse / Workshop 10), I checked whether I had forgotten a naughty option but no ...

I couldn't definitely find how to create a "SOA Project".


Thanks to Google (definitely my friend), I found that link :

http://forums.oracle.com/forums/thread.jspa?threadID=724742&tstart=0


Heidi Buelow, our SOA Suite Product Manager (if I'm not mistaken) says that the current production release does NOT support BPEL.

To be able to work with it, you will have to download the JDeveloper SOA TP4 !


Okay, let's get it !

I don't know why but I tried 4 times to download the file from OTN (with a simple browser) and each time, my download stopped at about 90%.

I used a download tool (GetRight) and now JDev 11G SOA TechPreview 4 is mine.


But no, still doesn't work ! I could recently check on Metalink (Oracle Support) what was to be done to activate the SOA sugar.

Go in the directory JDEV_HOME \ jdev \ bin  and edit the file "jdev.conf".

Comment the line starting with "AddVMOption -Dide.noextension=oracle.bam [...]" by adding a # in front of it.


And that's it : you will be able to do some BPEL with your favorite 11g IDE.


Edit : Now, the brand new version is out, you still may encounter a problem to use the "SOA Tier".

After installing Jdev 11.1.1.1.0 (11g), go in the menu "Help > Check for Updates" and you should see "Oracle SOA Composite Editor".


image


After the install, simply restart and you're done.


Mots clés Technorati : ,,,,

How to manage a server overload thanks to WorkManagers ?

In WebLogic 8, you had the ExecuteQueues to perform some tuning about the number of threads, assigning different scope of execution ...

In WebLogic 9+, the concept of WorkManager has been introduced.

BEA strongly recommends the use of WorkManagers instead of ExecuteQueues.

However, if you want to use the old mechanism, you may by specifying the option "-Dweblogic.Use81StyleExecuteQueues=true" in your JVM startup script.


One of the interesting use of WorkManager is to avoid an overload to a server by specifying a maximum request number.

Beyond that number, the server will reject new requests. Of course, it has a meaning only if you're using a cluster ...

Else, you would have some 5XX exceptions coming back to your users !


One of the prerequisites for that solution to work is that you use the WebLogic plugin,

and that you let the IdemPotent & the Dynamic Server List options set to true (which should be the case by default) in your plugin configuration.


Creating the resources


First, you will have to define a capacity constraint. Target it on the chosen instance.


image


Then, specify the maximum number of requests your instance can handle.


image


Then create the wrapping WorkManager and choose the subcomponent previously created (capacity constraint).


image


Assign that WorkManager to the server, (same instance targetted by the capacity constraint).


Checking the creation


Then check that your WorkManager and the capacity constraint are correctly targetted


 image


You're done.


And when the 101st request arrives on the server, the latter will send a HTTP 503 error.

Combined to the configuration of your plugin, this will dispatch the request to the next WebLogic Server instance in the cluster,

as shown below.


image


2008-09-25

[Book Review] Apache JMeter

As always, I'm reviewing a book from the rising publisher "Packt Publishing".

First thing I thought when holding the book is : "Wow, it's slim" :)

I previously worked with JMeter in 2003 and I appreciated the power of that excellent tool. I also used OpenSTA which is different.

I didn't work enough time with it to be able to compare them.
Yet, just on a feeling level, I was more convinced by JMeter.

Thus, it's with excitement that I read the first pages.

The first chapters were all about the basics : very useful for beginners or people who don't know what JMeter looks like.

It's really a must-read if you're new to JMeter. Else, it's a good refresh about the way you design and configure your test plans, etc.

It provides the useful information to know and I especially appreciated the last chapter (advanced configuration) in which you learn about FTP among other functionalities.

Recommended for everyone who need to rapidly understand and use this tremendous tool.


http://www.packtpub.com/beginning-apache-jmeter/book/hp/jmeter-abr/

You may find a sample chapter here : http://www.packtpub.com/article/functional-testing-with-jmeter


Mots clés Technorati : ,,

2008-09-19

Using JSP Precompilation in WebLogic

Typically, when you deploy an application, WebLogic Server tries to precompile the JSPs of your application.

But why ? How is it sensed to work normally ? What does this mechanism offer ?

That's what I'm going to explain in this article.


How did it work before ?

Well the original schema is the following : you typically deploy your application to your application server.

Once it's deployed, the first user that accesses a JSP has to wait a little bit, the time the JSP got compiled (transformed into a servlet).

As you can see, there is a small problem here : the fact that the JSP is compiled when a user accesses it.

It implies that some users may have to experience a delay when requesting a page, that's not exactly the idea of a good quality of service ...

That's this issue the precompilation was designed to address.


How do I setup precompilation ?

Nowadays, almost all application servers use precompilation.

As written above, precompilation is a way to prevent first users from compiling pages and then wait for them to show up.

You may use precompilation before or during a deployment.

You've got several ways to do so :

Using the weblogic.appc tool (pre-deployment compilation)

One good practice is to take the precompilation step and remove it from the deployment process.

When I say remove, it doesn't mean that we're going to suppress it, but rather than we will reorder the process.

Note : You could also use weblogic.jspc but it's deprecated.

Execute the appc tool like :


image


You'll see that the size of the WAR has changed (initially 2k)


image


If we take a closer look at the content of the WAR, we see a new directory and a new file :


image


As you can see, a new object "__index.class" has been created in the jsp_servlet directory, under WEB-INF\classes.

Note : When using Workshop, you may precompile your JSP by just checking a box :


image


Using the default mechanism : weblogic.xml (during deployment)

The default behavior is to not compile JSPs. If you want to turn that feature on, you'll have to specify it in your DD weblogic.xml.


<?xml version="1.0" encoding="UTF-8"?>
<wls:weblogic-web-app

xmlns:wls="http://www.bea.com/ns/weblogic/weblogic-web-app" xmlns:xsi="http://www.w3.org/2001/XMLSchema-instance"

xsi:schemaLocation="http://java.sun.com/xml/ns/javaee http://java.sun.com/xml/ns/javaee/web-app_2_5.xsd

http://www.bea.com/ns/weblogic/weblogic-web-app http://www.bea.com/ns/weblogic/weblogic-web-app/1.0/weblogic-web-app.xsd">
<wls:weblogic-version>10.3</wls:weblogic-version>
    <wls:context-root>JSP_Precompilation</wls:context-root>
    <wls:jsp-descriptor>
        <wls:precompile>true</wls:precompile>
        <wls:precompile-continue>true</wls:precompile-continue>
    </wls:jsp-descriptor>
</wls:weblogic-web-app>

Using the JSPClassServlet

You may also declare a servlet in your application that will take care of that task.

But the main con is the fact that you have to modify your application by adding extra components. To me, it's not a best practice.

But if you're interested in doing that : http://edocs.bea.com/wls/docs100/webapp/reference.html#wp73711


What's the difference when I precompile myself the JSP or when I let WebLogic do it ?

First of all, the deployment time :)

As the step of precompiling is doing prior to the deployment process, the latter is obviously shortened.

Second, in your directory tree, the location of your JSP won't be the same according to who does the precompilation job.

If you do it manually, compiled JSP will be located in the WEB-INF\classes directory of your WAR, as shown in the example with "weblogic.appc".


image


If you let WebLogic do it, it will be located (default) in the following tree (outside of the WAR), in the directory DOMAIN_HOME\servers\yourServer\tmp\_WL_user :


image


Or you may configure this directory by changing the attribute 'working-dir' in your weblogic.xml DD.


2008-09-11

Understanding WebLogic Clustering

This post is intended to help WebLogic beginners to understand and then set up a cluster.

If you're an advanced user, no need to longer read ! :)

What's a cluster ?

A cluster is an abstract representation of a group of a application servers also known as instances. It mainly allows :

  • failover, which provides, in case of crash of an instance, the ability to have a continued quality of service (QoS)
  • load-balancing, which, as it names says, allows a strong load to be balanced between the different instances
  • session-replication which combined to the failover mechanism, ensures that the user does not lose his/her session when an instance goes down

How does it work ?

From a WLS point of view, it's only a logical component you design and then, you affect the desired services to that cluster.

When I first worked with clustering, I thought I could make an HTTP call directly to the cluster, but it's not the case.

To do so, you will have to contact what's called a frontend.

That frontend is responsible for taking all the incoming requests and then dispatch them to the servers composing the cluster.

Concerning the inside communication, it lies on two mechanisms :

  • IP Sockets (communication between two instances, for replication ...)
  • IP Unicast or Multicast (used to know whether an instance is up or not ...)

More information

Note that BEA encourages the use of Unicast for a newly created cluster and Multicast when mixing WLS versions.

How to create it ?

Using the console or WLST, it's really easy.

  1. Create the cluster ( Environnement > Cluster) by first locking an edit session and click "New".
  2. Determine the kind of communication used for Heartbeat (Unicast recommended)
  3. Enroll all the managed servers
  4. Configure the "Cluster Address" (useful for EJBs, see below) and the frontend host & port (useful for webservices)

You're done !

Choosing your HTTP Frontend

Well, you've got the choice between :

  • an HTTP server (Apache, IIS, SunOne ...) + the WebLogic plugin
  • a DNS server
  • a hardware load-balancer (Alteon, BigIP ...)
  • another WLS instance, with the HttpClusteredServlet (available when you create a domain, for instance)

The choice depends on your will and on what your society allows :)

Failover : easy to configure !

The failover mechanism takes place when an instance goes down in a cluster. The users accessing the website should not be aware of that problem.

That's where the frontend plays an important role : it's responsible for routing all the new requests to the other available servers.

How does the frontend know which server is available and which is not ? Well, it depends of the nature of the frontend !

For instance, for an Apache WebServer configured with the WebLogic DSO module,

the initial server list is initially composed of a comma-separated succession of IP addresses and ports like the following :

<IfModule mod_weblogic.c>
WebLogicCluster w1s1.com:7001,w1s2.com:7001,w1s3.com:7001

[...]
</IfModule>

After the first call, the cluster maintains what's called the DSL or Dynamic Server List, thanks to the heartbeat.

When a server fails to respond to a heartbeat request, it is flagged as "failed" and is automatically removed from the DSL.

This list is supplied for each request to the frontend which uses it to dispatch requests.

For a phyical load-balancer, like an Alteon or BigIP, it performs the heartbeat itself.

If a server fails to answer, then the load-balancer removes this server from the list of potential ready servers.

Session replication

This mechanism is linked to the failover mechanism. When an instance goes down, new users must not only be routed to the fallen instance,

but users who were working on that instance (that is to say who were having an active session) must be able to keep doing what they were doing.

In other words, all the session initiated on that instance continue to live on another server.

The principle is simple, each session started on a server (aka primary server) is replicated on another server (aka secondary server).

The update only takes place at each set() method invocation.

Usually, it is recommended to have a session whose size is not over 40k, mainly for performance reasons.

Taken from the documentation, the format of a session cookie is:

sessionid!primary_server_id!secondary_server_id

where:

  • sessionid is a randomly generated identifier of the HTTP session. The length of the
    value is configured by the IDLength parameter in the <session-descriptor> element in
    the weblogic.xml file for an application. By default, the sessionid length is 52 bytes.
  • primary_server_id and secondary_server_id are 10 character identifiers of the
    primary and secondary hosts for the session.

Note: For sessions using non-replicated memory, cookie, JDBC, or file-based session persistence, the secondary_server_id is not present.

For sessions that use in-memory replication, if the secondary session does not exist, the secondary_server_id is “NONE”.


For increased performance, BEA strongly recommends to use Native IO versus pure Java socket readers. See my post about muxers to know more.

I strongly encourage you to go there : http://edocs.beasys.com/wls/docs100/cluster/failover.html#wp1039991 to read about "replication groups".

I wanted to make a sum up, but it's really well explained there + you will have pictures to make your understanding quicker.

Load-balancing ? Not harder to configure than failover ...

Well, it depends on what you want to load-balance. Because, according to the components you want to balance, the mechanisms are not the same.

Dealing with servlets, jsp and everything that lies on HTTP for the communication,

you have 4 solutions (see "Choosing your HTTP Frontend) but I'm going to list only the two which are WLS-related :

=> HttpClusterServlet, which is a simple servlet whose role is to provide a route, based on the round-robin algorithm.

It is often created while setting up your domain with the Config Manager. http://edocs.beasys.com/wls/docs100/cluster/setup.html#wp759939

=> a typical HttpServer such as Apache, IIS, SunOne, on which you will have to deploy a WLS plugin.

The configuration is the same than the one required for Failover (see above)


For EJBs, the load-balacing is made thanks to the cluster address configuration.

To make it easier to understand, you've got to understand that when you have a reference to an EJB,

it's a stub supplied by WebLogic Server which encapsulates/wraps the "real" EJB stub. The WLS stub is "replica-aware" :

that means that it is aware of all the EJBs deployed on other managed servers.

That's this mechanism which is used to perform load-balancing for EJBs.


Taken from the documentation : in WebLogic Server cluster, the cluster address is used in entity and stateless beans to construct the host name portion of request URLs.

You can explicitly define the cluster address when you configure the a cluster; otherwise, WebLogic Server dynamically generates the cluster address for each new request.

Allowing WebLogic Server to dynamically generate the cluster address is simplest, in terms of system administration, and is suitable for both development and production environments.

What about JNDI across the cluster ?

I won't say what's already well explained in the official documentation !


http://edocs.bea.com/wls/docs100/cluster/features.html#wp1007508


2008-09-01

Installing Alfresco on WebLogic 10.3 and Oracle XE

Everybody knows Documentum from EMC² but there is also a free tool, Alfresco, created by the father of Documentum,

which is also an excellent solution for keeping a community live and documented :)


As every other interesting tool, I tried to install it on my top application server and my top database !

This time, it wasn't too hard, even if it wasn't over-documented ...

Download Alfresco

Well it sounds obvious but you first have to download it.

Don't take the Tomcat version, but the WAR version. (it comes in a zip ~52Mb)

Make some changes to have it compatible with WebLogic classloader

As usual, this war comes with a variety of libs, and some of them may conflict with those embedded in WebLogic.

Then I recommend in this case to use the Filtering Class Loader mechanism.

To have it configured, you first have to turn you WAR in an EAR like :


image

Note : When I'm debugging some stuff while installing it, I prefer to use the exploded format, which is easier to update config files, adding extra libs and so on.

Configure it to use an Oracle database

I noticed that Alfresco is sensed to use a mySQL database.

To switch to an Oracle DB, you will have to modify some configuration files.

First one : repository.properties (alfresco.war\WEB-INF\classes\alfresco)

Look for the following section and change what's needed.

# Database configuration
db.schema.update=true
db.driver=oracle.jdbc.OracleDriver
db.name=xe
db.url=jdbc:oracle:thin:@localhost:1521:XE
db.username=alfresco
db.password=alfresco
db.pool.initial=10
db.pool.max=20

Second one : hibernate-cfg.properties (alfresco.war\WEB-INF\classes\alfresco\domain)

It's quite easy : only one line to change to reflect the new Hibernate dialect.

#
# Hibernate configuration
#
# hibernate.dialect=org.hibernate.dialect.MySQLInnoDBDialect
hibernate.dialect=org.hibernate.dialect.OracleDialect


To see whether it's really been taken into account, check the logs :


16:41:06,031 INFO [org.alfresco.repo.domain.schema.SchemaBootstrap] Schema managed by database dialect org.hibernate.dialect.OracleDialect.


If everything went well, your DB schema should have been created. You may take a look using your favorite DB tool :


image

Windows library (optional)

So far, if you're working with Windows, it works, but there is still an error :


java.lang.UnsatisfiedLinkError: no Win32NetBIOS in java.library.path


As said, you have to add the the lib called "Win32NetBIOS.dll"

(located in the bin directory of your Alfresco distribution) in either the java.library.path or in the Windows DLL directory (Windows/system32).

Enjoy ! :)

image


Mots clés Technorati : ,,

How to deploy Hudson on WebLogic ?

Hudson is an excellent continuous integration engine !

But if you have already tried to use it on WebLogic, you may have encoutered the following error :


hudson_ant


This error translated in English says :

"Your servlet container loaded its own Ant version, preventing Hudson to work.

Maybe you could try to fix that by either copying the Hudson lib in your container, or reversing the classloader tree with the child-delegation-first."

If you already read about the FilteringClassLoader mechanism article, it should ring a bell to you ! :)

Well, that's exactly what we are going to do here.

First, as Hudson is available only in WAR format, we are going to create an EAR (because the filteringClassLoader only applies to enterprise applications).

It's easy : just add a "META-INF" folder, like :


ROOT_Folder

----> META-INF

    ----> application.xml

    ----> Manifest.mf

    ----> weblogic-application.xml

----> hudson.war


Your weblogic-application.xml should look like :


<?xml version="1.0" encoding="UTF-8"?>
<wls:weblogic-application xmlns:wls="http://www.bea.com/ns/weblogic/weblogic-application" xmlns:xsi="http://www.w3.org/2001/XMLSchema-instance"

xsi:schemaLocation="http://java.sun.com/xml/ns/javaee http://java.sun.com/xml/ns/javaee/javaee_5.xsd http://www.bea.com/ns/weblogic/weblogic-application

http://www.bea.com/ns/weblogic/weblogic-application/1.0/weblogic-application.xsd">
<!-- server-version: 10.3 -->
    <wls:application-param>
        <wls:param-name>webapp.encoding.default</wls:param-name>
        <wls:param-value>UTF-8</wls:param-value>
    </wls:application-param>


    <wls:prefer-application-packages>
        <wls:package-name>org.apache.*</wls:package-name>
    </wls:prefer-application-packages>

</wls:weblogic-application>


In blue, we declared the org.apache package to be loaded from the application first.

Then after that, zip the content (and NOT your root folder) of your root folder such as :


image


Then deploy it on WebLogic and you should normally be able to access Hudson !


image


Mots clés Technorati : ,,,

2008-08-25

Using Workshop 10 for EJB 3.0 Development (from Greg Mally)

Note

I'm not the author of this article. It's Greg Mally, former BEA Workshop specialist (now Principal Solutions Architect @ Oracle).

As Dev2Dev blogs vanished, I made a safe copy of his article and even if now, you've got the possiblity of developing EJB3 within Workshop 10.3 without "tricks",

it's still useful to know how to develop EJB3 with a workshop 10. So here it is.

Enjoy !

Introduction

Workshop for WebLogic Platform 10.0, 10.1, and 10.2 rely on Web Tools Platform (WTP) 1.5 for Web and Java EE development.

This reliance introduces some challenges when trying to do Java Enterprise Edition 5 (JEE5/EE5) development since EE5 is not officially supported by WTP until the 2.0 release.

However, there are ways to "trick" WTP 1.5 into behaving nicely when doing certain types of EE5 development.

One area where WTP 1.5 and EE5 can coexist nicely is in the area of EJB 3.0.

This write-up is intended to demonstrate how to configure an EJB 2.1 project, which was created using the WTP 1.5 project creation wizard, for EJB 3.0 development.

Assumptions

Workshop for WebLogic version 10.0 or 10.1 is installed and you have a basic understanding of Workshop 10.x, the EJB 2.1 specification, and the EJB 3.0 specification.

Create a WTP EJB 2.1 Project

1. File > New > Project...

To access the WTP EJB 2.1 New Project wizard, be sure to select the Show All Wizards option in the New Project window:


image001


2. Select the EJB Project to start the New EJB Project wizard.


image002


3. Create the EJB Project with the appropriate values and facet configuration in the New EJB Project wizard.

All that is needed on page 1 of the wizard is the Project name:


image003


Remove the WebLogic EJB Extensions facet on page 2 of the wizard because this facet is specific to WebLogic EJB 2.1 development:


image004


At this point you can simply Finish creating the EJB Project.

Configure the EJB 2.1 Project for EJB 3.0 Support

1. Update the ejb-jar.xml file that was created by the wizard with the EJB 3.0 deployment descriptor Schema reference.

The ejb-jar.xml file that was created by the wizard is configured for EJB 2.1.
Although the EJB 3.0 specification states that the deployment descriptor is not necessary, WTP 1.5 requires that an ejb-jar.xml be present in the project.
To keep WTP 1.5 from complaining about a missing ejb-jar.xml, we can simply add an empty EJB 3.0 ejb-jar.xml.
The descriptor should be located in the ejbModule/META-INF directory of the project:


image005


The contents of the ejb-jar.xml should look something like the following:

<ejb-jar
    xmlns="http://java.sun.com/xml/ns/javaee"    xmlns:xsi="http://www.w3.org/2001/XMLSchema-instance"
    xsi:schemaLocation="http://java.sun.com/xml/ns/javaee
http://java.sun.com/xml/ns/javaee/ejb-jar_3_0.xsd"
    version="3.0">
</ejb-jar>


2. Your project is now ready for EJB 3.0 Session & MDB development.

At this point, WTP is fine because it sees the deployment descriptor it is expecting. You can now use all of the EJB 3.0 annotations for creating your new EJBs.

Create a Simple EJB 3.0 Stateless Session Bean


1. Create Interface Class.

Create a new Interface class called EchoService in the ejb3.beans package with a method definition called echo that accepts and returns a String.
Your new interface should look something like the following:


package ejb3.beans;

public interface EchoService {
    String echo(String echoValue);
}


2. Create Class that Implements Interface Class.

Create a new class called EchoServiceBean in the ejb3.beans package that extends EchoService and Serializable. Your new class should look something like the following:


package ejb3.beans;

import java.io.Serializable;

public class EchoServiceBean implements EchoService, Serializable {
    public String echo(String echoValue) {
        // TODO Auto-generated method stub
        return null;
    }
}


3. Add EJB Annotation to EJB 3.0 Bean class.

Add the @Stateless annotation with the name attribute of echoService to the EchoServiceBean class. Your EJB 3.0 Bean should look something like the following:


package ejb3.beans;

import java.io.Serializable;
import javax.ejb.Stateless;

@Stateless(name="echoService")
public class EchoServiceBean implements EchoService, Serializable {
    public String echo(String echoValue) {
    // TODO Auto-generated method stub
    return null;
   
   }
}


4. Add code to the body of the echo method that will echo the input parameter value.

Here's an example of what can be returned by the echo method:


public String echo(String echoValue) {
    return "Echo from - " + this.getClass().getName() + ": echoValue = " + echoValue;
}


Create Dynamic Web Project with EE5 Support


1. File > New > Project...

We are going to create a Dynamic Web Project called EJB3Servlet and a new EAR Application Project called EJB3ServletEAR.
(Note: the EAR can be created on the first page of the New Dynamic Web Project wizard).
Other than the Project name and EAR Project Name, you can use the defaults.

Once you have done this, we will configure the Dynamic Web Project for EE5 support. We will bundle the Web and EJB projects in the EJB3ServletEAR to test out our simple EJB 3.0 Bean.

2. Update the web.xml with the Servlet 2.5 deployment descriptor Schema reference.

Much like was done for the EJB Project, we are going to tweak the web.xml for Servlet 2.5.
This will tell WLS that resource injection can occur, which is necessary for accessing the new EJB via EJB 3.0 annotations in Servlets.
The tweak involves updating the descriptor with the Servlet 2.5 schema reference:


<web-app id="WebApp_ID"
    version="2.5"
    xmlns="http://java.sun.com/xml/ns/javaee"
    xmlns:xsi="http://www.w3.org/2001/XMLSchema-instance"
    xsi:schemaLocation="http://java.sun.com/xml/ns/javaee
http://java.sun.com/xml/ns/javaee/web-app_2_5.xsd">


3. Add a Module Dependency for the EAR Project to the EJB 3.0 Project

Make sure that the EAR project that was created in step 1 has the EJB 3.0 project as a Module Dependency. The project properties for the EAR should look something like the following:

image006

Test the Simple EJB 3.0 Stateless Session Bean


1. Add Servlet to the Dynamic Web Project

Using the Create Servlet wizard (e.g., File > New > Other..., then Web/Servlet), specify a Class name of InvokeEJB. The wizard should look something like the following:


image007


2. Annotate Servlet for EJB 3.0 Reference

Add the @EJB annotation to the new Servlet above a variable declaration to the EchoService Bean. The code should look like the following:


@EJB()
private EchoService echoService;


At deployment time, WebLogic Server will inject the EJB 3.0 reference into the local variable which will be used in the doGet method.

Best Practices/Performance Consideration: If you define your variable declaration as private or protected, then you should also define a setter and a getter for the variable because WLS will do setter injection vs. field injection. Setter injection performs better than field injection when using encapsulation good practices. Here's an example:


@EJB()
private EchoService echoService;   

public void setEchoService (EchoService value) {
    this.echoService = value;
}

public EchoService getEchoService() {
    return this.echoService;
}


3. Invoke the EJB 3.0 Bean in the doGet Servlet method using the following code:


ServletOutputStream outputStream = response.getOutputStream();
if(echoService != null) {
outputStream.println("Start EJB Invoke");
outputStream.println("<br><br>");
outputStream.println(echoService.echo("Servlet Request"));
outputStream.println("<br><br>");
outputStream.println("Invoke Complete");
} else {
outputStream.println("ERROR. EJB Reference is null");}


4. Run on Server to Invoke Servlet via Run As > Run on Server

5. Review Output

Assuming everything is configured correctly, the WebLogic Server will have done the EJB 3.0 injection into the Servlet and the results will look like the following when the Servlet is run:

image008

Mots clés Technorati : ,