Note
I'm not the author of this article. It's Greg Mally, former BEA Workshop specialist (now Principal Solutions Architect @ Oracle).
As Dev2Dev blogs vanished, I made a safe copy of his article and even if now, you've got the possiblity of developing EJB3 within Workshop 10.3 without "tricks",
it's still useful to know how to develop EJB3 with a workshop 10. So here it is.
Enjoy !
Introduction
Workshop for WebLogic Platform 10.0, 10.1, and 10.2 rely on Web Tools Platform (WTP) 1.5 for Web and Java EE development.
This reliance introduces some challenges when trying to do Java Enterprise Edition 5 (JEE5/EE5) development since EE5 is not officially supported by WTP until the 2.0 release.
However, there are ways to "trick" WTP 1.5 into behaving nicely when doing certain types of EE5 development.
One area where WTP 1.5 and EE5 can coexist nicely is in the area of EJB 3.0.
This write-up is intended to demonstrate how to configure an EJB 2.1 project, which was created using the WTP 1.5 project creation wizard, for EJB 3.0 development.
Assumptions
Workshop for WebLogic version 10.0 or 10.1 is installed and you have a basic understanding of Workshop 10.x, the EJB 2.1 specification, and the EJB 3.0 specification.
Create a WTP EJB 2.1 Project
1. File > New > Project...
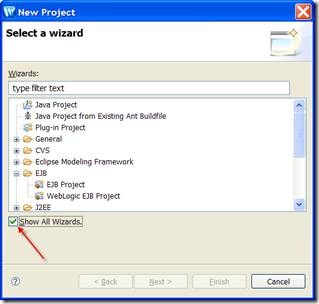
To access the WTP EJB 2.1 New Project wizard, be sure to select the Show All Wizards option in the New Project window:
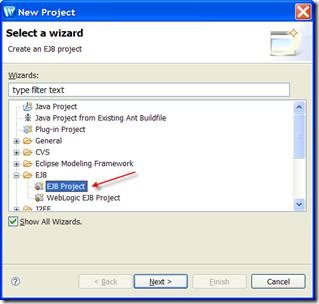
2. Select the EJB Project to start the New EJB Project wizard.
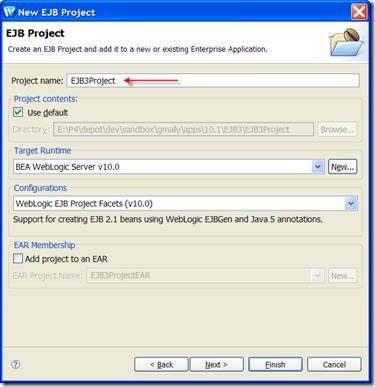
3. Create the EJB Project with the appropriate values and facet configuration in the New EJB Project wizard.
All that is needed on page 1 of the wizard is the Project name:
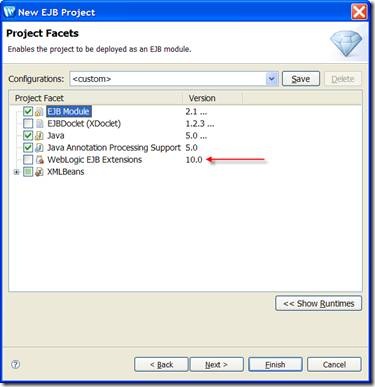
Remove the WebLogic EJB Extensions facet on page 2 of the wizard because this facet is specific to WebLogic EJB 2.1 development:
At this point you can simply Finish creating the EJB Project.
Configure the EJB 2.1 Project for EJB 3.0 Support
1. Update the ejb-jar.xml file that was created by the wizard with the EJB 3.0 deployment descriptor Schema reference.
The ejb-jar.xml file that was created by the wizard is configured for EJB 2.1.
Although the EJB 3.0 specification states that the deployment descriptor is not necessary, WTP 1.5 requires that an ejb-jar.xml be present in the project.
To keep WTP 1.5 from complaining about a missing ejb-jar.xml, we can simply add an empty EJB 3.0 ejb-jar.xml.
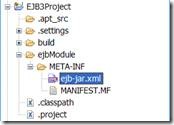
The descriptor should be located in the ejbModule/META-INF directory of the project:
The contents of the ejb-jar.xml should look something like the following:
<ejb-jar
    xmlns="http://java.sun.com/xml/ns/javaee"    xmlns:xsi="http://www.w3.org/2001/XMLSchema-instance"
    xsi:schemaLocation="http://java.sun.com/xml/ns/javaee
http://java.sun.com/xml/ns/javaee/ejb-jar_3_0.xsd"
    version="3.0">
</ejb-jar>
2. Your project is now ready for EJB 3.0 Session & MDB development.
At this point, WTP is fine because it sees the deployment descriptor it is expecting. You can now use all of the EJB 3.0 annotations for creating your new EJBs.
Create a Simple EJB 3.0 Stateless Session Bean
1. Create Interface Class.
Create a new Interface class called EchoService in the ejb3.beans package with a method definition called echo that accepts and returns a String.
Your new interface should look something like the following:
  package ejb3.beans;

  public interface EchoService {
        String echo(String echoValue);
    }
2. Create Class that Implements Interface Class.
Create a new class called EchoServiceBean in the ejb3.beans package that extends EchoService and Serializable. Your new class should look something like the following:
  package ejb3.beans;

  import java.io.Serializable;

  public class EchoServiceBean implements EchoService, Serializable {
        public String echo(String echoValue) {
            // TODO Auto-generated method stub
            return null;
        }
    }
3. Add EJB Annotation to EJB 3.0 Bean class.
Add the @Stateless annotation with the name attribute of echoService to the EchoServiceBean class. Your EJB 3.0 Bean should look something like the following:
  package ejb3.beans;

  import java.io.Serializable;
  import javax.ejb.Stateless;

  @Stateless(name="echoService")
  public class EchoServiceBean implements EchoService, Serializable {
      public String echo(String echoValue) {
      // TODO Auto-generated method stub
      return null;

     }
  }
4. Add code to the body of the echo method that will echo the input parameter value.
Here's an example of what can be returned by the echo method:
  public String echo(String echoValue) {
      return "Echo from - " + this.getClass().getName() + ": echoValue = " + echoValue;
  }
Create Dynamic Web Project with EE5 Support
1. File > New > Project...
We are going to create a Dynamic Web Project called EJB3Servlet and a new EAR Application Project called EJB3ServletEAR.
(Note: the EAR can be created on the first page of the New Dynamic Web Project wizard).
Other than the Project name and EAR Project Name, you can use the defaults.
Once you have done this, we will configure the Dynamic Web Project for EE5 support. We will bundle the Web and EJB projects in the EJB3ServletEAR to test out our simple EJB 3.0 Bean.
2. Update the web.xml with the Servlet 2.5 deployment descriptor Schema reference.
Much like was done for the EJB Project, we are going to tweak the web.xml for Servlet 2.5.
This will tell WLS that resource injection can occur, which is necessary for accessing the new EJB via EJB 3.0 annotations in Servlets.
The tweak involves updating the descriptor with the Servlet 2.5 schema reference:
    <web-app id="WebApp_ID"
        version="2.5"
        xmlns="http://java.sun.com/xml/ns/javaee"
        xmlns:xsi="http://www.w3.org/2001/XMLSchema-instance"
        xsi:schemaLocation="http://java.sun.com/xml/ns/javaee
    http://java.sun.com/xml/ns/javaee/web-app_2_5.xsd">
3. Add a Module Dependency for the EAR Project to the EJB 3.0 Project
Make sure that the EAR project that was created in step 1 has the EJB 3.0 project as a Module Dependency. The project properties for the EAR should look something like the following:

Test the Simple EJB 3.0 Stateless Session Bean
1. Add Servlet to the Dynamic Web Project
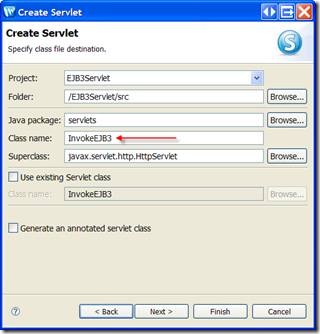
Using the Create Servlet wizard (e.g., File > New > Other..., then Web/Servlet), specify a Class name of InvokeEJB. The wizard should look something like the following:
2. Annotate Servlet for EJB 3.0 Reference
Add the @EJB annotation to the new Servlet above a variable declaration to the EchoService Bean. The code should look like the following:
  @EJB()
  private EchoService echoService;
At deployment time, WebLogic Server will inject the EJB 3.0 reference into the local variable which will be used in the doGet method.
Best Practices/Performance Consideration: If you define your variable declaration as private or protected, then you should also define a setter and a getter for the variable because WLS will do setter injection vs. field injection. Setter injection performs better than field injection when using encapsulation good practices. Here's an example:
    @EJB()
    private EchoService echoService;

    public void setEchoService (EchoService value) {
        this.echoService = value;
    }

    public EchoService getEchoService() {
        return this.echoService;
    }
3. Invoke the EJB 3.0 Bean in the doGet Servlet method using the following code:
ServletOutputStream outputStream = response.getOutputStream();
if(echoService != null) {
    outputStream.println("Start EJB Invoke");
    outputStream.println("<br><br>");
    outputStream.println(echoService.echo("Servlet Request"));
    outputStream.println("<br><br>");
    outputStream.println("Invoke Complete");
} else {
    outputStream.println("ERROR. EJB Reference is null");}
4. Run on Server to Invoke Servlet via Run As > Run on Server
5. Review Output
Assuming everything is configured correctly, the WebLogic Server will have done the EJB 3.0 injection into the Servlet and the results will look like the following when the Servlet is run:

